Most programs follow a similar pattern:
In this chapter you will learn how to call functions that can read input from the keyboard, allocate memory for storing data, and write output to the screen.
We start with a program that has no input. It simply writes constant data to the screen — the “Hello World” program.
We will use the C system call function write to display the text on the screen and show how to call it in assembly language. As we saw in Section 2.8 (page 53) the write function requires three arguments. Reading the argument list from left to right in Listing 8.1:
This program uses only constant data — the text string “Hello world.” Constant data used by a program is part of the program itself and is not changed by the program.
Looking at the compiler-generated assembly language in Listing 8.2, the constant data appears on line 4, as indicated by the comment added on that line. Comments have also been added on lines 11 – 14 to explain the argument set up for the call to write.
Data can only be located in one of two places in a computer:
(We are ignoring the case of reading from an input device or writing to an output device here.) Recall from the discussion of memory segments on page 502 that the Linux kernel uses different memory segments for the various parts of a program. The directive on line 2,
uses the .section assembler directive to direct the assembler to store the data that follows in a “read-only data” section in the object file. Even though it begins with a ‘.’ character .rodata is not an assembler directive but the name of a section in an ELF file.
Your first thought is probably that the .rodata section should be loaded into a data segment in memory, but recall that data memory segments are read/write. Thus .rodata sections are mapped into a text segment, which is a read-only memory segment.
The .string directive on line 4,
allocates enough bytes in memory to hold each of the characters in the text string, plus one for the NUL character at the end. The first byte contains the ASCII code for the character ’H’, the second the ASCII code for ’e’, etc. Notice that the last character in this string is ’\n’, the newline character; it occupies only one byte of memory. So fourteen bytes of memory are allocated in the .rodata section in this program, and each byte is set to the corresponding ASCII code for each character in the text string. The label on line 3 provides a symbolic name for the beginning address of the text string so that the program can refer to this memory location.
The most common directives for allocating memory for data are shown in Table 8.1.
| [label] | .space | expression | evaluates expression and allocates that many bytes; memory is not initialized |
| [label] | .string | "text" | initializes memory to null-terminated string |
| [label] | .asciz | "text" | same as .string |
| [label] | .ascii | "text" | initializes memory to the string without null |
| [label] | .byte | expression | allocates one byte and initializes it to the value of expression |
| [label] | .word | expression | allocates two bytes and initializes them to the value of expression |
| [label] | .long | expression | allocates four bytes and initializes them to the value of expression |
| [label] | .quad | expression | allocates eight bytes and initializes them to the value of expression |
If these are used in the .rodata section, the values can only be used as constants in the program.
The assembly language instruction used to call a function is
|
| call | functionName | |
where functionName is the name of the function being called. The call instruction does two things:
The call of the write function is made on line 14.
Before the call is made, any arguments to a function must be stored in their proper locations, as specified in the ABI [25]. Up to six arguments are passed in the general purpose registers. Reading the argument list from left to right in the C code, the order of using the registers is given in Table 8.2.
| Argument | Register |
| first | rdi |
| second | rsi |
| third | rdx |
| fourth | rcx |
| fifth | r8 |
| sixth | r9 |
If there are more than six arguments, the additional ones are pushed onto the call stack, but in right-to-left order. This will be described in Section 11.2.
Each of the three arguments to write in this program — the file descriptor, the address of the text string, and the number of bytes in the text string — is also a constant whose value is known when the program is first loaded into memory and is not changed by the program. The locations of these constants on lines 11 – 13,
are not as obvious. The location of the data that an instruction operates on must be specified in the instruction and its operands. The manner in which the instruction uses an operand to locate the data is called the addressing mode. Assembly language includes a syntax that the programmer uses to specify the addressing mode for each operand. When the assembler translates the assembly language into machine code it sets the bit pattern in the instruction to the corresponding addressing mode for each operand. Then when the CPU decodes the instruction during program execution it knows where to locate the data represented by that operand.
The simplest addressing mode is register direct. The syntax is to simply use the name of a register, and the data is located in the register itself.
The instructions on lines 9 – 10,
use the register direct addressing mode for their operands. The pushq instruction has only one operand, and the movq has two.
Each of the instructions on lines 11 – 13 use the register direct addressing mode for the destination, but the source operand is the data itself. So all three instructions employ the immediate data addressing mode for the source.
Although the register direct addressing mode can be used to specify either a source or destination operand, or both, the immediate data addressing mode is valid only for a source operand.
Let us consider the mechanism by which the control unit accesses the data in the immediate data addressing mode. First, we should say a few words about how a control unit executes an instruction. Although a programmer thinks of each instruction as being executed atomically, it is actually done in discrete steps by the control unit. In addition to the registers used by a programmer, the CPU contains many registers that cannot be used directly. The control unit uses these registers as “scratch paper” for temporary storage of intermediate values as it progresses through the steps of executing an instruction.
Now, recall that when the control unit fetches an instruction from memory, it automatically increments the instruction pointer (rip) to the next memory location immediately following the instruction it just fetched. Usually, the instruction pointer would now be pointing to the next instruction in the program. But in the case of the immediate data addressing mode, the “$” symbol tells the assembler to store the operand at this location.
As the control unit decodes the just fetched instruction, it detects that the immediate data addressing mode has been used for the source operand. Since the instruction pointer is currently pointing to the data, it is a simple matter for the control unit to fetch it. Of course, when it does this fetch, the control unit increments the instruction pointer by the size of the data it just fetched.
Now the control unit has the source data, so it can continue executing the instruction. And when it has completed the current instruction, the instruction pointer is already pointing to the next instruction in the program.
The constants in the instructions on lines 11 and 13 are obvious. (The symbolic name “STDOUT_FILENO” is defined in unistd.h as 1.) The constant on line 12 is the label .LC0, which resolves to the address of this memory location. As explained above, this address will be in the .rodata section when the program is loaded into memory. The address is not known within the .text segment when the file is first compiled. The compiler leaves space for it immediately after the instruction (immediate addressing mode). Then when the address is determined during the linking phase, it is plugged in to the space left for it. The net result is that the address becomes immediate data when the program is executed.
So the following code sequence:
implements the C statement
in the original C program (Listing 8.1, page 542).
Some notes about the write function call:
Most variables are stored on the call stack. Before describing how this is done, we need to understand what stacks are and how they are used.
A stack is an area of memory for storing data items together with a pointer to the “top” of the stack. Informally, you can think of a stack as being organized very much like a stack of dinner plates on a shelf. We can only access the one item at the top of the stack. There are only two fundamental operations on a stack:
Notice that a stack is a “last in, first out” (LIFO) data structure. That is, the last thing to be pushed onto the stack is the first thing to be popped off.
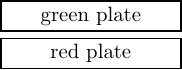
To illustrate the stack concept let us use our dinner plate example. Say we have three differently colored dinner plates, a red one on the dining table, a green one on the kitchen counter, and a blue one on the bedside table. Now we will stack them on the shelf in the following way:
At this point, our stack looks like:
Now if we perform the operation:
we will have a blue dinner plate on our kitchen counter, and our stack will look like:
A stack must be used according to a very strict discipline:
If you have no use for the item(s) to be popped off, you may simply adjust the stack pointer. This is equivalent to discarding the items that are popped off. (Our dinner plate analogy breaks down here.)
A good way to maintain this discipline is to think of the use of parentheses in an algebraic expression. A push is analogous to a left parenthesis, and a pop is analogous to a right parenthesis. An attempt to push too many items onto a stack causes stack overflow. And an attempt to pop items off the stack beyond the “bottom” causes stack underflow.
Next we will explore how we might implement a stack in C. Our program will allocate space in memory for storing data elements and provide both a push operation and a pop operation. A simple program is shown in Listing 8.3.
Read the code in Listing 8.3 and note the following:
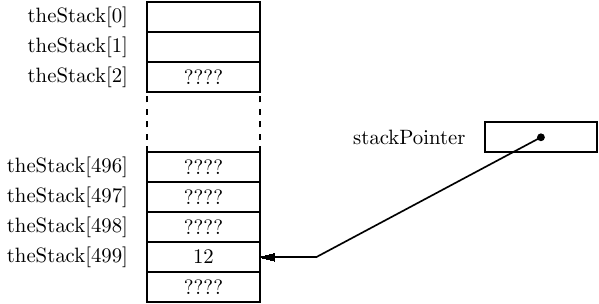
The states of the variables from the program in Listing 8.3 are shown just after the stack is initialized in Figure 8.1. Notice that the stack pointer is pointing beyond the end of the array as a result of the C statement,
The stack is “empty” at this point.

After pushing one value onto the stack
the stack appears as shown in Figure 8.2. Here you can see that since the push operation pre-decrements the stack pointer, the first data item to be placed on the stack is stored in a valid portion of the array.
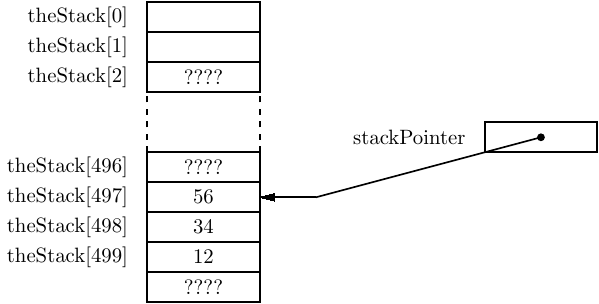
After all three data items — x, y, and z — are pushed onto the stack, it appears as shown in Figure 8.3. The stack pointer always points to the data item that is at the top of the stack. Notice that this stack is “growing” toward lower numbered elements in the array.
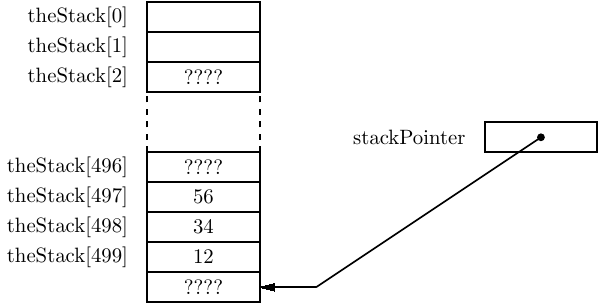
After changing the values in the variables, the program in Listing 8.3 restores the original values by popping from the stack in reverse order. The state of the stack after all three pops are shown in Figure 8.4. Even though we know that the values are still stored in the array, the permissible stack operations — push and pop — will not allow us to access these values. Thus, from a programming point of view, the values are gone.
Our very simple stack in this program does not protect against stack overflow or stack underflow. Most software stack implementations also include operations to check for an empty stack and for a full stack. And many implementations include an operation for looking at, but not removing, the top element. But these are not the main features of a stack data structure, so we will not be concerned with them here.
In GNU/Linux, as with most operating systems, the call stack has already been set up for us. We do not need to worry about allocating the memory or initializing a stack pointer. When the operating system transfers control to our program, the stack is ready for us to use.
The x86-64 architecture uses the rsp register for the call stack pointer. Although you could create your own stack and stack pointer, several instructions use the rsp register implicitly. And all these instructions cause the stack to grow from high memory addresses to low (see Exercise 8-2). Although this may seem a bit odd at first, there are some good reasons for doing it this way.
In particular, think about how you might organize things in memory. Recall that the instruction pointer (the rip register) is automatically incremented by the control unit as your program is executed. Programs come in vastly different sizes, so it makes sense to store the program instructions at low memory addresses. This allows maximum flexibility with respect to program size.
The stack is a dynamic structure. You do not know ahead of time how much stack space will be required by any given program as it executes. It is impossible to know how much space to allocate for the stack. So you would like to allocate as much space as possible, and to keep it as far away from the programs as possible. The solution is to start the stack at the highest address and have it grow toward lower addresses.
This is a highly simplified rationalization for implementing stacks such that they grow “downward” in memory. The organization of various program elements in memory is much more complex than the simple description given here. But this may help you to understand that there are some good reasons for what may seem to be a rather odd implementation.
The assembly language push instruction is:
|
| pushq | source | |
The pushq instruction causes two actions:
The assembly language pop instruction is:
|
| popq | destination | |
The popq instruction causes two actions:
In the Intel syntax the “q” is not appended to the instruction.
|
| push | source | |
| Intel® Syntax |
| pop | destination |
The size of the operand, eight bytes, is determined by the operating system. When executing in 64-bit mode, all pushes and pops operate on 64-bit values. Unlike the mov instruction, you cannot push or pop 8-, 16-, or 32-bit values. This means that the address in the stack pointer (rsp register) will always be an integral multiple of eight.
A good example of using a stack is saving registers within a function. Recall that there is only one set of registers in the CPU. When one function calls another, the called function has no way of knowing which registers are being used by the calling function. The ABI [25] specifies that the values in registers rbx, rbp, rsp, and r12 – r15 be preserved by the called function (see Table 6.4 on page 469).
The program in Listing 8.4 shows how to save and restore the values in these registers. Notice that since a stack is a LIFO structure, it is necessary to pop the values off the top of the stack in the reverse order from how they were pushed on.
The problem with this technique is maintaining the address in the stack pointer at a 16-byte boundary. Another way to save/restore the registers will be given in Section 11.2.
This seems like a good place to use gdb to see how a stack frame is created and used. We will use the program in Listing 8.4. I used an editor to enter the code then assembled and linked it.
When using gdb to examine programs written in assembly language, another variant of the break command may be helpful. The version of gdb I used for this book skips over the function prologue. To cause gdb to break at the first instruction of a function, the following form should be used:
My typing is boldface.
$ gdb ./saveRegisters
I use the li command to list enough of the program to see where I should set the first breakpoints.
(gdb) br *main
I set the first breakpoint on the first instruction in the function. Notice that the label is on line 10, but it applies to the instruction on line 11. The second breakpoint is after all the registers have been saved on the call stack.
(gdb) run
I run the program, it breaks at the first breakpoint, and I can display the registers.
(gdb) i r rsp rbp rbx r12 r13 r14 r15 rip
I use the i r (info registers) command to display the contents of the registers that are used in this program. The numbers in the right-hand column show the decimal equivalent of the bit patterns for some of the registers. If you replicate this example (a good thing to do) you will probably get different values in your registers.
Next I want to follow how the stack changes as the program executes. This is a little tricky. The stack grows toward lower addresses, but gdb displays memory from low to high addresses. So I need to display the area of memory that the stack will grow into in order to see how this program changes it.
(gdb) x/7xg 0x7fffffffe068-6*8
Six 64-bit registers will be pushed onto the stack. Since there are eight bytes in each register, I start the display of the stack memory at the current stack pointer (in the rsp register) minus 6*8 bytes. (Use the help x command if you forget the syntax for the examine memory command.) By displaying seven 64-bit values, I can see the value that was pushed onto the stack just before this function was called.
(gdb) cont
When I continue, the program stops at the next breakpoint. I examine the memory that the stack is growing into and can see that the register contents were saved on the stack.
(gdb) i r rsp rbp rbx r12 r13 r14 r15 rip
A display of the registers shows that their contents have not changed, except the stack pointer (rsp) and the instruction pointer (rip). Note that the stack pointer is now pointing to the top of the stack area used by this function.
(gdb) li
The li command helps me decide where to set my next two breakpoints, and I continue to the next breakpoint.
(gdb) i r rsp rbp rbx r12 r13 r14 r15 rip
Now we can see that the registers that were saved on the stack have been changed.
(gdb) cont
Continuing on to the next breakpoint and displaying the registers shows that the general purpose registers that were used — rbx, r12, r13, r14, and r15 — have been restored.
(gdb) si
Two single steps brings us to the last instruction, ret, which will return to the operating system. A display of the registers shows that they have been restored to the values they had when this function first started. Of course, the instruction pointer (rip) has changed.
(gdb) cont
Finally, I use the continue command (cont) to run the program out to its end. Note: If you use the si command to single step beyond the ret instruction at the end of the main function, gdb will dutifully take you through the system libraries. At best, this is a waste of time.
(gdb) q
$
And, of course, I have to tell gdb to quit.
Now we see that we can store values on the stack by pushing them, and that the push operation decreases the value in the stack pointer register, rsp. In other words, allocating variables on the call stack involves subtracting a value from the stack pointer. Similarly, deallocating variables from the call stack involves adding a value to the stack pointer.
From this it follows that we can create local variables on the call stack by simply subtracting the number of bytes required by each variable from the stack pointer. This does not store any data in the variables, it simply sets aside memory that we can use. (Perhaps you have experienced the error of forgetting to initialize a local variable in C!)
Next, we have to figure out a way to access this reserved data area on the call stack. Notice that there are no labels in this area of memory. So we cannot directly use a name like we did when accessing memory in the .data segment.
We could use the popl and pushl instructions to store data in this area. For example,
could be used to store zero in a variable. But this technique would obviously be very tedious, and any changes made to your code would almost certainly lead to a great deal of debugging. For example, can you figure out the reason I had to do a pop before pushing the value onto the stack? (Recall that the four bytes have already been reserved on the stack.)
At first, it may seem tempting to use the stack pointer, rsp, as the reference pointer. But this creates complications if we wish to use the stack within the function.
A better technique would be to maintain another pointer to the local variable area on the stack. If we do not change this pointer throughout the function, we can always use the base register plus offset addressing mode to directly access any of the local variables. The syntax is:
|
| offset(register_name) | |
| Intel® Syntax | [register_name + offset] | |
When it is zero, the offset is not required.
| Intel® Syntax | [rbp - 8]; [rsi]; [rax + 12] |
The appropriate register for implementing this is the frame pointer, rbp.
When a function is called, the calling function begins the process of creating an area on the stack, called the stack frame. Any arguments that need to be passed on the call stack are first pushed onto it, as described in Section 11.2. Then the call instruction pushes the return address onto the call stack (page 546).
The first thing that the called function must do is to complete the creation of the stack frame. The function prologue, first introduced in Section 7.2 (page 498), performs the following actions at the very beginning of each function:
Once the function prologue has completed the stack frame, we observe that:
Notice that each local variable is located at some fixed offset from the base register, rbp. In fact, it’s a negative offset.
Listing 8.5 is the compiler-generated assembly language for the program in Listing 2.4 (page 53). Comments have been added to explain the parts of the code being discussed here.
The function begins by pushing a copy of the caller’s frame pointer (in the rbp register) onto the call stack, thus saving it. Next it sets the frame pointer for this register at the current top of the stack. These two actions establish a reference point to the stack frame for this function.
Next the program allocates sixteen bytes on the stack for the local variable, thus growing the stack frame by sixteen bytes. It may seem wasteful to set aside so much memory since the only variable in this program requires only one byte of memory, but the ABI [25] specifies that the stack pointer (rsp) should be on a sixteen-byte address boundary before calling another function. The easiest way to comply with this specification is to allocate memory for local variables in multiples of sixteen.
Figure 8.5 shows the state of the stack just after the prologue has been executed.
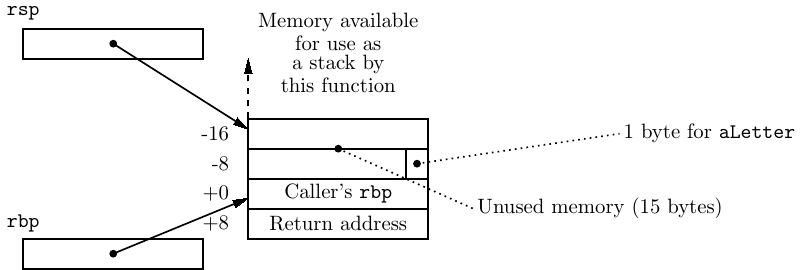
The return address to the calling function is safely stored on the stack, followed by the caller’s frame pointer value. The stack pointer (rsp) has been moved up the stack to allow memory for the local variable. If this function needs to push data onto the stack, such activity will not interfere with the local variable, the caller’s frame pointer value, nor the return address. The frame pointer (rbp) provides a reference point for accessing the local variable.
Most of the code in the body of the function is already familiar to you, but the instruction that loads the address of the local variable, aString into the rax register:
is new. It uses the base register plus offset addressing mode for the source. We can see from the instruction on line 18 that the aString variable is located one byte negative from the address in the rbp register. Since the call stack grows toward negative addresses, this is the next available byte in this function’s stack frame.
As with the write function, the second argument to the read function must be the address of a variable. However, the address of aString cannot be known when the program is compiled and linked because it is the address of a variable that exists in the stack frame. There is no way for the compiler or linker to know where this function’s stack frame will be in memory when it is called. The address of the variable must be computed at run time.
Each instruction that accesses a stack frame variable must compute the variable’s address, which is called the effective address. The instruction for computing addresses is load effective address — leal for 32-bit and leaq for 64-bit addresses. The syntax of the lea instruction is
|
| leaw | source, %register | |
where w = l for 32-bit, q for 64-bit.
| Intel® Syntax |
| lea | register, source |
The source operand must be a memory location. The lea instruction computes the effective address of the source operand and stores that address in the destination register. So the instruction
takes the value in rbp (the base address of this function’s stack frame), adds -1 to it, and stores this sum in rax. Now rax contains the address of the variable aLetter. (The address still needs to be moved to rsi for the call to the read function.)
So the following code sequence:
implements the C statement
in the original C program (Listing 2.4, page 53). (Yes, it would have been more efficient to use rsi as the destination for the leaq instruction. Recall that this program was compiled with the -O0 option, no optimization. You can also expect this to vary across different versions of the compiler.)
Some notes about the read function call:
There is also a new instruction on line 33:
Just before this function exits the portion of the stack frame allocated by this function must be released and the value in the rbp register restored. The leave instruction performs the actions:
which effectively
After the epilogue has been executed, the stack is in the state shown in Figure 8.6.
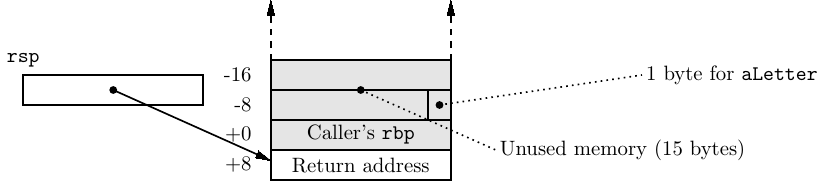
The stack pointer (rsp) points to the address that will return program flow back to the instruction immediately after the call instruction that called this function. Although the data that was stored in the memory which is now above the stack pointer is still there, it is a violation of stack protocol to access it.
One more step remains in completing execution of this function — returning to the calling function. Since the return address is at the top of the call stack, this is a simple matter of popping the address from the top of the stack into the rip register. This requires a special instruction,
|
| ret | |
which does not require any arguments.
Recall that there are two classes of local variables in C:
Most local variables in a function are automatic variables. General purpose registers are used for local variables whenever possible. Since there is only one set of general purpose registers, a function that is using one for a variable must be careful to save the value in the register before calling another function. Register usage is specified by the ABI [25] as shown in Table 6.4 on page 469. But you should not write code that depends upon everyone else following these recommendations, and there are only a small number of registers available for use as variables. In C/C++, most of the automatic variables are typically allocated on the call stack. As you have seen in the discussion above, they are created (automatically) in the prologue when the function first starts and are deleted in the epilogue just as it ends. Static variables must be stored in the data segment.
We are now in a position to write the echoChar program in assembly language. The program is shown in Listing 8.6.
This program introduces another assembler directive (lines 6,7,9,10,15,18):
|
| .equ | name, expression | |
The .equ directive evaluates the expression and sets the name equivalent to it. Note that the expression is evaluated during assembly, not during program execution. In essence, the name and its value are placed on the symbol table during the first pass of the assembler. During the second pass, wherever the programmer has used “name” the assembler substitutes the number that the expression evaluated to during the first pass.
You see an example on line 9 of Listing 8.6:
In this case the expression is simply -1. Then when the symbol is used on line 34:
the assembler substitutes -1 during the second pass, and it is exactly the same as if the programmer had written:
Of course, using .equ to provide a symbolic name makes the code much easier to read.
An example of a more complex expression is shown on lines 13 – 15:
The “.” means “this address”. Recall that the .string directive allocates one byte for each character in the text string, plus one for the NUL character. So it has allocated 22 bytes here. The expression computes the difference between the beginning and the end of the memory allocated by .string, minus 1. Thus, promptSz is entered on the symbol table as being equivalent to 21. And on line 28 the programmer can use this symbolic name,
which is much easier than counting each of the characters by hand and writing:
More importantly, the programmer can change the text string and the assembler will compute the new length and change the number in the instruction automatically. This is obviously much less prone to error.
Notice that the amount of memory allocated for local variables is a multiple of 16 in order to preserve optimal stack pointer alignment:
The printf function can be used to format data and write it to the screen, and the scanf function can be used to read formatted input from the keyboard. In order to see how to call these two functions in assembly language we begin with the C program in Listing 8.7.
The assembly language generated by the gcc compiler is shown in Listing 8.8. Comments have been added to explain the printf and scanf calls.
The first call to printf passes only one argument. However, on line 17 in Listing 8.8 0 is passed in eax:
The eax register is not listed as being used for passing arguments (see Section 8.1).
Both printf and scanf can take a variable number of arguments. The ABI [25] specifies that the total number of arguments passed in SSE registers must be passed in rax. As you will learn in Section 14.5, the SSE registers are used for passing floats in 64-bit mode. Since no float arguments are being passed in this call, rax must be set to 0. Recall that setting eax to 0 also sets the high-order bits of rax to 0 (Table 7.1, page 508).
The call to scanf on line 14 in the C version passes two arguments:
That call is implemented in assembly language on lines 19 – 23 in Listing 8.8:
Again, we see that the eax register must be set to 0 because there are no float arguments.
The program written in assembly language (Listing 8.9) is easier to read because the programmer has used symbolic names for the constants and the stack variable.
When designing a function in assembly language, you need to determine where each local variable will be located in the memory that is allocated on the call stack. The ABI [25] specifies that:
These rules are best illustrated by considering the program in Listing 8.10.
The assembly language generated by the compiler is shown in Listing 8.11 with comments added for explanation.
Twenty-three bytes are required for storing these variables:
However, the ABI states that the stack pointer must be on a 16-byte address boundary, so we need to allocate 32 bytes for the local variables:
Listing 8.12 shows how an assembly language programmer uses symbolic names to write code that is easier to read. In this program, each variable is at the same relative location in the stack frame as in the gcc-generated version.
Notice the assembly language syntax for single character constants on lines 26 – 28:
The GNU assembly language info documentation specifies that only the first single quote, ’A, is required. But the C syntax, ’A’, also works, so we have used that because it is generally easier to read.1
We can summarize the proper sequence of instructions for establishing a local variable environment in a function:
Just before ending this function, these three steps need to be undone. Since the frame pointer is pointing to where the top of the stack was before we allocated memory for local variables, the local variable memory can be deleted by simply copying the value in the frame pointer to the stack pointer. Now the calling function’s frame pointer value is at the top of the stack. The ending sequence is:
Listing 8.13 shows the general format that must be followed when writing a function. If you follow this format and do everything in the order that is given for all your functions, you will have many fewer problems getting them to work properly. If you do not, I guarantee that you will have many problems.
The printf and scanf functions discussed in Section 2.5 (page 37) are C library functions that convert program data to and from text formats for interacting with users via the screen and keyboard. The write and read functions discussed in Section 2.8 (page 53) are C wrapper functions that only pass bytes to output and from input devices, relying on the program to perform the conversions so that the bytes are meaningful to the I/O device. Ultimately, each of these functions call upon the services of the operating system to perform the actual byte transfers to and from I/O devices.
In assembly language, you do not need to use the C environment. The convention is to begin program execution at the __start label. (Note that there are two underscore characters.) The assembler is used as before, but instead of using gcc to link in the C libraries, use ld directly. You need to specify the entry point of your program. For example, the command for the program in Listing 8.14 is:
When performing I/O you invoke the Linux operations yourself. The technique involves moving the arguments to specific registers, placing a special code in the eax register, and then using the syscall instruction to call a function in the operating system. (The way this works is described in Section 15.6 on page 875.) The operating system will perform the action specified by the code in the eax register, using the arguments passed in the other registers. The values required for reading from and writing to files are given in Table 8.3.
| system call | eax | edi | rsi | edx |
| read | 0 | file descriptor | pointer to place to store bytes | number of bytes to read |
| write | 1 | file descriptor | pointer to first byte to write | number of bytes to write |
| exit | 60 |
|
|
|
In Listing 8.14 we have rewritten the program of Listing 8.6 without using the C environment.
Comparing this program with the one in Listing 8.6, the program arguments are the same and are passed in the same registers. The only difference with using the syscall function is that you have to provide a code for the operation to be performed in the eax register. The complete list of system operations that can be performed are in the system file /usr/include/asm-x86_64/unistd.h. (The path on your system may be different.)
To determine the arguments that must be passed to each system operation read section 2 of the man page for that operation. For example, the arguments for the write system call can be seen by using
Then follow the rules in Section 8.1 for placing the arguments in the proper registers.
In 32-bit mode all the arguments are pushed onto the call stack in right-to-left order. Listing 8.15 shows how to call the write() system call function.
After all three arguments have been pushed onto the call stack, it looks like:
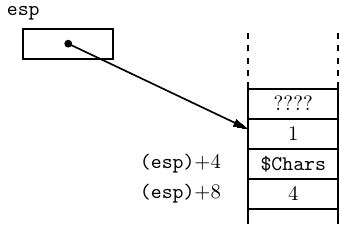
where the notation (esp) + n means “the address in the esp register plus n.” The stack pointer, the esp register, points to the last item pushed onto the call stack. The other two arguments are stored on the stack below the top item. Don’t forget that “below” on the call stack is at numerically higher addresses because the stack grows toward lower addresses.
When the call instruction is executed, the return address is pushed onto the call stack as shown here:
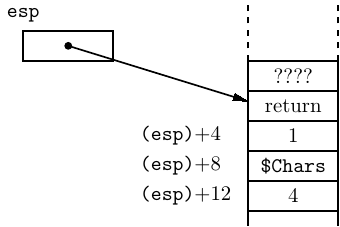
where “return” is the address where the called function is supposed to return to at the end of its execution. So the arguments are readily available inside the called function; you will learn how to access them in Chapter 8. And as long as the called function does not change the return address, and restores the stack pointer to the position it was in when the function was called, it can easily return to the calling function.
Now, let’s look at what happens to the stack memory area in the assembly language program in Listing 8.15. Assume that the value in the esp register when the main function is called is 0xbffffc5c and that the value in the ebp register is 0xbffffc6a. Immediately after the subl $8, %esp instruction is executed, the stack looks like:
| address | contents |
| bffffc50: | ???????? |
| bffffc54: | ???????? |
| bffffc58: | bffffc6a |
| bffffc5c: | important information |
the value in the esp register is 0xbffffc50, and the value in the ebp register is 0xbffffc58. The “?” indicates that the states of the bits in the indicated memory locations are irrelevant to us. That is, the memory between locations 0xbffffc50 and 0xbffffc57 is “garbage.”
We have to assume that the values in bytes number 0xbffffc5c, 5d, 5e, and 5f were placed there by the function that called this function and have some meaning to that function. So we have to be careful to preserve the value there.
Since the esp register contains 0xbffffc50, we can continue using the stack — pushing and popping — without disturbing the eight bytes between locations 0xbffffc50 and 0xbffffc57. These eight bytes are the ones we will use for storing the local variables. And if we take care not to change the value in the ebp register throughout the function, we can easily access the local variables.
This summary shows the assembly language instructions introduced thus far in the book. The page number where the instruction is explained in more detail, which may be in a subsequent chapter, is also given. This book provides only an introduction to the usage of each instruction. You need to consult the manuals ([2] – [6], [14] – [18]) in order to learn all the possible uses of the instructions.
| data movement: | ||||
| opcode | source | destination | action | page |
| movs | $imm/%reg | %reg/mem | move | 506 |
| movs | mem | %reg | move | 506 |
| movsss | $imm/%reg | %reg/mem | move, sign extend | 693 |
| movzss | $imm/%reg | %reg/mem | move, zero extend | 693 |
| popw | %reg/mem | pop from stack | 566 | |
| pushw | $imm/%reg/mem | push onto stack | 566 | |
| s = b, w, l, q; w = l, q
| ||||
| arithmetic/logic:
| ||||
| opcode | source | destination | action | page |
| cmps | $imm/%reg | %reg/mem | compare | 676 |
| cmps | mem | %reg | compare | 676 |
| incs | %reg/mem | increment | 698 | |
| leaw | mem | %reg | load effective address | 579 |
| subs | $imm/%reg | %reg/mem | subtract | 612 |
| subs | mem | %reg | subtract | 612 |
| s = b, w, l, q; w = l, q
| ||||
| program flow control:
| |||
| opcode | location | action | page |
| call | label | call function | 546 |
| je | label | jump equal | 679 |
| jmp | label | jump | 691 |
| jne | label | jump not equal | 679 |
| leave | undo stack frame | 580 | |
| ret | return from function | 583 | |
| syscall | call kernel function | 587 | |
| register direct: | The data value is located in a CPU register. |
|
| syntax: name of the register with a “%” prefix. |
|
| example: movl %eax, %ebx |
| immediate data: | The data value is located immediately after the instruction. Source operand only. |
|
| syntax: data value with a “$” prefix. |
|
| example: movl $0xabcd1234, %ebx |
| base register plus offset: | The data value is located in memory. The address of the memory location is the sum of a value in a base register plus an offset value. |
|
| syntax: use the name of the register with parentheses around the name and the offset value immediately before the left parenthesis. |
|
| example: movl $0xaabbccdd, 12(%eax) |
(§8.1) Enter the C program in Listing 8.1 and get it to work correctly. Run the program under gdb, setting a break point at the call to write. When the program breaks, use the si (Step one instruction exactly) command to execute the instructions that load registers with the arguments. As you do this, keep track of the contents in the appropriate argument registers and the rip register. What is the address where the text string is stored? If you single step into the write function, use the cont command to continue through it.
(§8.2) Modify the program in Listing 8.3 so that the stack grows from lower numbered array elements to higher numbered ones.
(§8.2) Enter the assembly language program in Listing 8.4 and show that the rbp and rsp registers are also saved and restored by this function.
(§8.4) Enter the C program in Listing 2.4 (page 53) and compile it with the debugging option, -g. Run the program under gdb, setting a break point at each of the calls to write and read. Each time the program breaks, use the si (Step one instruction exactly) command to execute the instructions that load registers with the arguments. As you do this, keep track of the contents in the appropriate argument registers and the rip register. What are the addresses where the text strings are stored? What is the address of the aLetter variable? If you single step into either the write or read functions, use the cont command to continue through it.
(§8.4) Modify the assembly language program in Listing 8.6 such that it also reads the newline character when the user enters a single character. Run the program with gdb. Set a breakpoint at the first instruction, then run the program. When it breaks, write down the values in the rsp and rbp registers. Write down the changes in these two registers as you single step (si command) through the first three instructions.
Set breakpoints at the instruction that calls the read function and at the next instruction immediately after that one. Examine the values in the argument-passing registers.
From the addresses you wrote down above, determine where the two characters (user’s character plus newline) that are read from the keyboard will be stored, and examine that area of memory.
Use the cont command to continue execution through the read function. Enter a character. When the program breaks back into gdb, examine the area of memory again to make sure the two characters got stored there.
(§8.4) Write a program in assembly language that prompts the user to enter an integer, then displays its hexadecimal equivalent.
(§8.4) Write a program in assembly language that “declares” four char variables and four int variables, and initializes all eight variables with appropriate values. Then call printf to display the values of all eight variables with only one call.